QPR ProcessAnalyzer Use Cases
Here are some important use cases for QPR ProcessAnalyzer functionalities.
Benchmarking
In the following process analysis view, I want to compare the process flows that go through the "Sales Order Changed" and the "Purchase Order to Supplier" activities:
- First, I select the "Sales Order Changed" activity and click the Include Only button to get a filter that shows only the cases that go through the "Sales Order Changed" activity.
- I'll name the filter, so it will be easier to select it later. I click the Manage Filters button in the Filter group on the ribbon to open the Manage Filters dialog.
- The filter is selected on the list, so I click Properties, and give the filter the name "BenchExample1". Then, I click OK to close the Filter Properties dialog, and then Cancel to close the Manage Filters dialog.
- Then, I'll want to do the same to the "Purchase Order to Supplier" activity, so I'll click Change > Restore Default to get the initial unfiltered view visible again.
- I select the "Purchase Order to Supplier" activity, and select Include Only.
- Next, I'll benchmark the current filtered view with the "BenchExample1" I named earlier. From the Flowchart Analysis Settings Benchmarking section, I'll select the "BenchExample1" filter. Now I have the two filtered views visible:
- From the Flowchart Analysis Settings Benchmarking section, I select the "Account Manager" to see the Account Managers who are responsible for the orders:
Filtering
From the process analysis shown below, I want to see activities in only the cases in which the process flow goes from the "Additional Visit" activity to the "First Aid" activity.
- I press down the Ctrl key and click on the "First Aid" and "Additional Visit" activities, so that they are selected.
- Then, by clicking Include Only > Event Types, I get a process analysis with only the two selected activities:
- Now, I select the flow going from "Additional Visit" to "First Aid" and click Include Only > Cases. The result is as follows:
- As the Event Type filter I created before is still active, I select Change > Clear Event Type Filters. Now I have all the activities visible in cases where the process goes from "Additional Visit" to "First Aid":
Working with Large Datasets
When you have a model with a large set of data in QPR ProcessAnalyzer, you can use it for doing comprehensive process analysis by drilling down to a relevant set of data. For example, you can find out root causes for deviations in your process by running Influence Analysis using filters. This will help you smooth out and reduce those deviations and thus improve your process. Below are some methods for dealing with a large data set when analyzing a process.
Method 1: Create Base Model with Filtering
When dealing with a large amount of data, it is important to find the relevant set of data for your analysis needs and focus the attention to that part of the process. For example, you can take a baseline process and create a sub-model from it by using e.g. a specific region as the selected attribute to filter the data.
To achieve this, do as follows:
- Open your model in Project Workspace. Flowchart Analysis will open.
- Select Profiling Analysis from the ribbon.
- From the Profiled Attribute in Settings, select the attribute you want to base your analysis. In our example this attribute is region.
- Select the attribute you are interested in from the list and then Include Only (Cases) from the ribbon.
- Now the Flowchart Analysis shows you the sub-model with focus on the particular region you selected. You can also repeat the steps 2-5 using a different attribute to get information related to other attributes than region.
- You can then rename the filter you created (in Manage Filters) so it is easier to find and also make it the Model Default filter.
Method 2: Drill-down from One Analysis to Another
Another way to limit the analysis results is to use the drill-down functionality. First you need to look at the model you have as a basis for further analysis. Then you can limit the data set for analysis by drilling down to a meaningful set of cases. For example, we want to examine the cases of the region we selected earlier.
To achieve this, do as follows:
- Open the model that has the Model Default filter we defined in Method 1.
- In our example, we want to see how many days it takes for cases to be completed in this particular region. To do this, select Duration Analysis from the ribbon.
- Now we want to find out what contributes most to the long duration for this particular set of cases. Select the long-lasting cases from the list and run Influence Analysis from the ribbon. The most contributing factors are at the top of the list.
Next Step: Adjusting the Sample Size
After you have found the focus of your analysis by limiting it to relevant data using the methods described above, you can increase the sample size to include more cases which match your chosen data focus.
To adjust the sample size, do as follows:
- Open the Manage Filters dialog from the ribbon.
- Select the filter you have created and open Properties.
- In the Sample Size group box, select the All: radio button to include all cases (or enter an integer to the Limit To: field if you want to define the limit yourself).
Detecting Parallelism in Business Processes
QPR ProcessAnalyzer can be used for discovering and analyzing parallelism in business processes. The Event Type, Path, and Flows analyses are used as the starting points for parallelism analyses. After discovering the parallel branch, it can then be further analyzed with, for example, Flowchart Analysis by excluding other Event Types.
Event Type Analysis in Parallelism Analysis
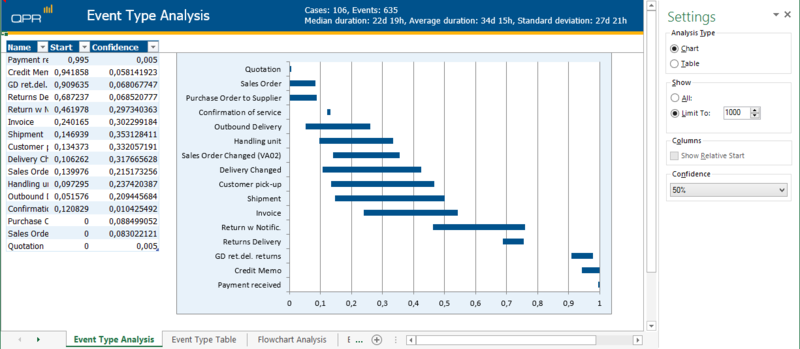
The Event Type Analysis in the Chart mode shows the relative time period for the occurrences of each Event Type. Then it's just a matter of checking which Event Types appear on the same time period, and you see the parallelism:
Path Analysis in Parallelism Analysis
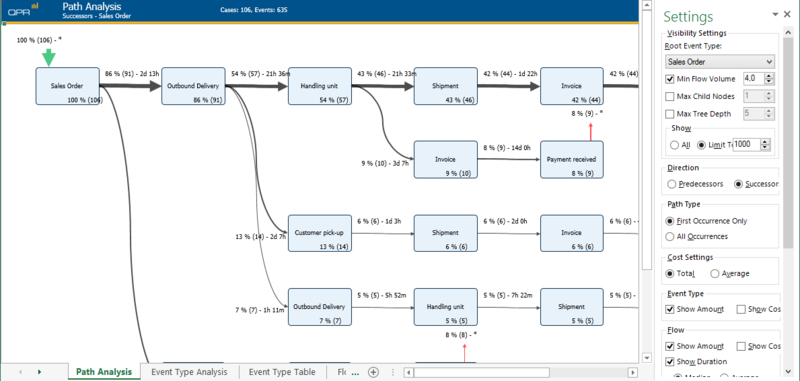
Path analysis graphically shows the Successors for each Event Type. This is a graphical way to discover the Event Types that act as starting points for parallel branches:

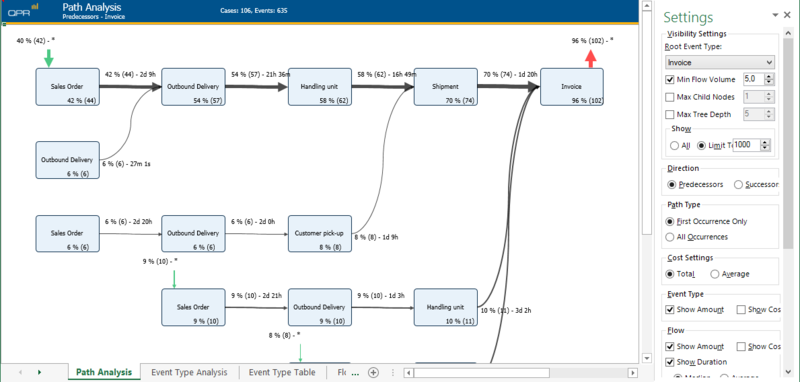
You can also have the Path Analysis show the ending points of the parallel branches by selecting the Predecessors direction:
Flows Analysis in Parallelism Analysis
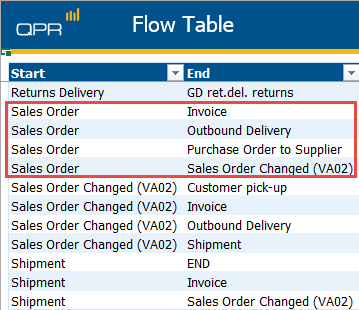
The Flows Analysis makes it possible to discover starting and ending Event Types for parallel branches for the whole model. In the example below, one of branching Event Types is the Sales Order Event Type:
Publishing Analysis Results to Others
A pre-requisite for publishing results to others is a suitably small analysis, as a complex analysis result is harder to understand. So first use filters to make the analysis more clear. There are two ways to publish the analysis:
Static sharing
- Use QPR ProcessAnalyzer to create analyses and rename the created Excel worksheet(s) between different analyses you want to share.
- Save the Excel workbook.
- Send the workbook to the recipients or copy paste the workbook into PowerPoint.
Dynamic sharing
Dynamic sharing requires that the recipients either already have a user account for the QPR ProcessAnalyzer web service you are using, or that you have sufficient user rights to create a user account for them.
- In the Manage Users dialog, create a group to which you want to share the results. File:User Manager Create Group.png File:Create User Group.png
- Create a Join-in Token, copy it to the clipboard and send it to the recipients for example via E-mail. Note that when using the Join-In Token, the recipient users must already have their own user ID and password for the QPR ProcessAnalyzer web service connection you are using.
- Alternatively, assign or create the recipient users to the group.
- Give the group access rights to the project you want to share.
- Additionally, create Bookmarks of the analyses you want to share.
Adding Case Attributes to Model
It's possible to add data from the table type views (e.g. Cases Analysis) as case attributes to the model. In this example, we will add the Variation Path case attribute, so that it can be utilized for example in benchmarking.
- Open the model from which you wish to add the case attributes.
- Click Cases to get all the cases in the model.
- From the Case Analysis Settings, select Event Type String, this will add a column that contains the variation paths.
File:CaseAnalysisSettingsEventTypeString.png - Copy the whole Case Table and paste it into a new sheet.
- Delete all other columns (Shift cells left) except the ones containing the Case Ids and the Event Type Strings.
File:CasesDeleteColumns.png - Add a new row to the top of the table.
- Name the first column as "CASE_ID".
- The name of the second column will be the name of the variation path case attribute, name it for example "Variation Path".
File:CasesColumnsNamed.png - Now the data is ready to be imported as case attributes, on the QPR ProcessAnalyzer tab, click Project Workspace.
- The Workspace dialog opens. Click the Import button.
- The Import Wizard opens. Select Case Attributes to be imported and click Next.
File:CaseAttributesImportStart.png - Select Current Worksheet and click Next.
- Select Add to Existing Model.
- From the Project drop-down menu, select the project in which the target model exists.
- Select the target model from the drop-down list and click Import.
- After the import is complete, click Flowchart.
- On the Benchmark group of the Flowchart Analysis Settings, select the Variation Path Case Attribute.
Flowchart Analysis with Variation Path Case Attribute Benchmarking
Process Simulator
QPR ProcessAnalyzer Process Simulator is a small VBA script that produces simulation logs for QPR ProcessAnalyzer.
Donwload Link
Instructions
- Copy the Flow Table from your QPR ProcessAnalyzer model to the Process Simulator as a new sheet.
- Click the START SIMULATION IN Flow Table MODE button on the SIMULATION sheet.
- Enter the amount of cases to be created by the simulation.
- Import the data into QPR ProcessAnalyzer as a new model.
Source Code
Dim EventRow Dim Transitions Dim Stage Dim program_start As Date Dim simulation_start As Date Dim case_start As Date Dim SimulationResultWorksheet As Worksheet Dim SimulationDataWorksheet As Worksheet Dim SimulationActiveWorksheet As Worksheet Dim FlowTableMode Sub QPR_PA_FlowTable_Simulator() Call QPR_ProcessAnalyzer_Simulator(True) End Sub Sub QPR_PA_Simulator() Call QPR_ProcessAnalyzer_Simulator(False) End Sub Sub QPR_ProcessAnalyzer_Simulator(ByVal mode As Boolean) Dim case_id As Long Dim case_name As String Dim total_cases As Long On Error Resume Next Set SimulationActiveWorksheet = Application.ActiveSheet FlowTableMode = mode Set SimulationDataWorksheet = Nothing If (FlowTableMode) Then Set SimulationDataWorksheet = Application.Worksheets("Flow Table") If (SimulationDataWorksheet Is Nothing) Then MsgBox ("Parameter sheet named 'Flow Table' not found, please open the Flow Table with QPR ProcessAnalyzer before running the simulation") Exit Sub End If Else Set SimulationDataWorksheet = Application.Worksheets("SIMULATION_DATA") If (SimulationDataWorksheet Is Nothing) Then Call CreateSimulationDataWorksheet("SIMULATION_DATA") End If End If Set SimulationResultWorksheet = Nothing Set SimulationResultWorksheet = Application.Worksheets("SIMULATION_RESULT") If (SimulationResultWorksheet Is Nothing) Then Set SimulationResultWorksheet = Application.Sheets.Add SimulationResultWorksheet.Name = "SIMULATION_RESULT" End If SimulationResultWorksheet.Cells.Clear SimulationResultWorksheet.Cells(1, 1).Value = "CaseId" SimulationResultWorksheet.Cells(1, 2).Value = "Activity" SimulationResultWorksheet.Cells(1, 3).Value = "Time" SimulationResultWorksheet.Columns("A:C").ColumnWidth = 30 EventRow = 2 Transitions = 0 program_start = Date + Time case_start = program_start total_cases = InputBox("Enter the amount of cases", "QPR ProcessAnalyzer Simulator") For x = 1 To total_cases case_name = "Case_" + Str(x) SimulationActiveWorksheet.Cells(1, 1) = case_name 'show counter for user Stage = "START" simulation_start = case_start Dim i i = 0 'counter i is used to limit maximum amount of events per one case in order to break execution of infinite loops Do While (GetNextStage() And (i < 1000)) If ((FlowTableMode) And (case_name = "END")) Then Exit Do End If Call WriteEvent(case_name, Stage, simulation_start) i = i + 1 Loop Next SimulationActiveWorksheet.Cells(1, 1) = "" Dim comment_text As String comment_text = "QPR ProcessAnalyzer Simulator" + Chr(10) comment_text = comment_text + "Start: " + Format(program_start, "ddmmyyyy hhmmss") + Chr(10) comment_text = comment_text + "Total cases: " + CStr(total_cases) + Chr(10) comment_text = comment_text + "Total created events: " + CStr(EventRow - 1) + Chr(10) comment_text = comment_text + "Transitions in simulation data: " + CStr(Transitions) + Chr(10) comment_text = comment_text + "Duration: " + Format(Date + Time - program_start, "hhmmss") + " (hhmmss)" + Chr(10) SimulationResultWorksheet.Cells(1, 1).AddComment SimulationResultWorksheet.Cells(1, 1).Comment.Visible = False SimulationResultWorksheet.Cells(1, 1).Comment.text text:=comment_text SimulationResultWorksheet.Cells(1, 1).Comment.Shape.Width = 200 SimulationResultWorksheet.Cells(1, 1).Comment.Shape.Height = 150 comment_text = comment_text + "To upload simulation results to QPR ProcessAnalyzer:" + Chr(10) comment_text = comment_text + "1. Activate the SIMULATION_RESULT sheet containing the results" + Chr(10) comment_text = comment_text + "2. Log into QPR ProcessAnalyzer" + Chr(10) comment_text = comment_text + "3. Open Model Manager and press Import" + Chr(10) comment_text = comment_text + "4. Select 'Events', desired model and start import" + Chr(10) MsgBox (comment_text) End Sub Function GetNextStage() Dim rnd_probability Dim row_probability Dim counter Dim row_stage Dim start_event_col Dim end_event_col Dim probability_col If (FlowTableMode) Then start_stage_col = 2 next_stage_col = 3 probability_col = 10 Else start_stage_col = 1 next_stage_col = 2 probability_col = 3 End If rnd_probability = Rnd * 100 counter = 2 'actual transitions start from row 2, first row is for column headers Do row_stage = SimulationDataWorksheet.Cells(counter, start_stage_col) If row_stage = "" Then GetNextStage = False 'end of material, next stage not found Exit Function End If If row_stage = Stage Then row_probability = SimulationDataWorksheet.Cells(counter, probability_col) If rnd_probability < row_probability Then If (Stage = "START") Then case_start = simulation_start Stage = SimulationDataWorksheet.Cells(counter, next_stage_col) If (FlowTableMode) Then If (row_stage = "END") And (Stage = "END") Then GetNextStage = False 'Flow Table contains row END -> END, prevent loop Exit Function End If simulation_start = simulation_start + GetDuration(SimulationDataWorksheet.Cells(counter, 13) / 5, SimulationDataWorksheet.Cells(counter, 14) * 5) Else simulation_start = simulation_start + GetDuration(SimulationDataWorksheet.Cells(counter, 4), SimulationDataWorksheet.Cells(counter, 5)) End If GetNextStage = True 'next stage found OK, exit function Exit Function Else rnd_probability = rnd_probability - row_probability End If End If If (Transitions < counter - 1) Then Transitions = counter - 1 'total amount of transitions in the simulation data, for reporting only counter = counter + 1 Loop End Function Function GetDuration(ByVal d1 As Long, ByVal d2 As Long) Dim ZeroToOne Do ZeroToOne = Rnd Loop Until ZeroToOne > 0 GetDuration = d1 + (d2 - d1) * Application.WorksheetFunction.BetaInv(ZeroToOne, 1.5, 3) End Function ' WriteEvent writes one event row to Sub WriteEvent(ByVal case_name As String, ByVal act As String, ByVal starttime As Date) SimulationResultWorksheet.Cells(EventRow, 1).Value = case_name SimulationResultWorksheet.Cells(EventRow, 2).Value = act SimulationResultWorksheet.Cells(EventRow, 3).Value = starttime EventRow = EventRow + 1 End Sub Sub CreateSimulationDataWorksheet(ByVal sheet_name As String) MsgBox ("Workbook does not contain sheet '" + sheet_name + "', creating a sample") Set SimulationDataWorksheet = Application.Sheets.Add SimulationDataWorksheet.Name = sheet_name SimulationDataWorksheet.Cells(1, 1).Value = "Start" SimulationDataWorksheet.Cells(1, 2).Value = "End" SimulationDataWorksheet.Cells(1, 3).Value = "Successor Probability" SimulationDataWorksheet.Cells(1, 4).Value = "Min Duration" SimulationDataWorksheet.Cells(1, 5).Value = "Max Duration" SimulationDataWorksheet.Columns("A:E").ColumnWidth = 20 SimulationDataWorksheet.Cells(2, 1).Value = "START" SimulationDataWorksheet.Cells(2, 2).Value = "Lead" SimulationDataWorksheet.Cells(2, 3).Value = 100 SimulationDataWorksheet.Cells(2, 4).Value = 1 SimulationDataWorksheet.Cells(2, 5).Value = 2 SimulationDataWorksheet.Cells(3, 1).Value = "Lead" SimulationDataWorksheet.Cells(3, 2).Value = "Contact" SimulationDataWorksheet.Cells(3, 3).Value = 60 SimulationDataWorksheet.Cells(3, 4).Value = 1 SimulationDataWorksheet.Cells(3, 5).Value = 20 SimulationDataWorksheet.Cells(4, 1).Value = "Lead" SimulationDataWorksheet.Cells(4, 2).Value = "Offer" SimulationDataWorksheet.Cells(4, 3).Value = 40 SimulationDataWorksheet.Cells(4, 4).Value = 2 SimulationDataWorksheet.Cells(4, 5).Value = 40 SimulationDataWorksheet.Cells(5, 1).Value = "Contact" SimulationDataWorksheet.Cells(5, 2).Value = "END" SimulationDataWorksheet.Cells(5, 3).Value = 100 SimulationDataWorksheet.Cells(5, 4).Value = 0 SimulationDataWorksheet.Cells(5, 5).Value = 0 SimulationDataWorksheet.Cells(6, 1).Value = "Offer" SimulationDataWorksheet.Cells(6, 2).Value = "END" SimulationDataWorksheet.Cells(6, 3).Value = 100 SimulationDataWorksheet.Cells(6, 4).Value = 0 SimulationDataWorksheet.Cells(6, 5).Value = 0 End Sub


